Configuring Network Interfaces for Load Balancer with NAT
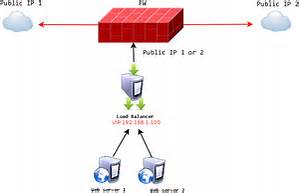
The NAT topology allows us to utilize the hardware that we have, but one issue it has the limited ability in handling large loads hence the need for configuring a load balancer. Topology for a load balancer using NAT routing is the easiest in that only one access point to a public network is needed.LVS router is used by the real servers in passing requests back hence they are on a private network. with NAT topology real servers are not limited to Linux machines only for it to perform their task correctly
these are the two steps to set up a load balancer with NAT.
Configure public networks network interfaces and the private network on the LVS routers.
example
let’s say LVS routers’ public interfaces (eth0) will be on the 192.168.2/24 network (This is not a routable IP, but assume there is a firewall in front of the LVS router) and the private interfaces that link to the real servers (eth1) will be on the 10.1.12/24 network.
Note that editing of the following files pertain to the network service and the Load Balancer is not compatible with the NetworkManager service.
on the active or node of the primary LVS router, the public interface’s script for network, /etc/sysconfig/network-scripts/ifcfg-eth0, could look like this;
𝐷𝐸𝑉𝐼𝐶𝐸=𝑒𝑡0
𝐵𝑂𝑂𝑇𝑃𝑅𝑂𝑇𝑂=𝑠𝑡𝑎𝑡𝑖𝑐
𝑂𝑁𝐵𝑂𝑂𝑇=𝑦𝑒𝑠
𝐼𝑃𝐴𝐷𝐷𝑅=192.168.25.9
𝑁𝐸𝑇𝑀𝐴𝑆𝐾=255.255.255.0
𝐺𝐴𝑇𝐸𝑊𝐴𝑌=192.168.25.254
on /etc/sysconfig/network-scripts/ifcfg-eth1 for the private NAT interface as on the LVS router could look like this:
𝐷𝐸𝑉𝐼𝐶𝐸=𝑒𝑡1
𝐵𝑂𝑂𝑇𝑃𝑅𝑂𝑇𝑂=𝑠𝑡𝑎𝑡𝑖𝑐
𝑂𝑁𝐵𝑂𝑂𝑇=𝑦𝑒𝑠
𝐼𝑃𝐴𝐷𝐷𝑅=10.1.12.9
𝑁𝐸𝑇𝑀𝐴𝑆𝐾=255.255.255.0
from the example, the VIP for the LVS router’s public interface will be 192.168.25.10 and the VIP for the NAT/private interface will be 10.1.12.10. we can see that it is essential for the real servers to route requests back to the VIP for the NAT interface.
The sample Ethernet interface configuration settings in this section are for the real IP addresses of an LVS router and not the floating IP addresses.
when configuring the primary LVS router node’s network interfaces, we have to configure the backup LVS router’s real network interfaces — ensuring that none of the IP addresses conflict with any other IP addresses on the network.
Be sure each interface on the backup node services the same network as the interface on primary node. Lets say if eth0 connects to the public network on the primary node, it must also connect to the public network on the backup node as well.
Routing on the Real Servers
When configuring the real servers’ network interfaces in a NAT topology the most important thing to keep in mind is to set the gateway for the NAT floating address of the LVS router
example
we use address 10.1.12.10
Once the network interfaces are up on the real servers, no machines will be able to ping or connect in in any oter ways to the public network.pin will only be possible to te real IP for te LVS routers private interface,te IP is 10.1.12.9
the real server’s /etc/sysconfig/network-scripts/ifcfg-eth0 file is most likely be similar to this:
𝐷𝐸𝑉𝐼𝐶𝐸=𝑒𝑡0
𝑂𝑁𝐵𝑂𝑂𝑇=𝑦𝑒𝑠
𝐵𝑂𝑂𝑇𝑃𝑅𝑂𝑇𝑂=𝑠𝑡𝑎𝑡𝑖𝑐
𝐼𝑃𝐴𝐷𝐷𝑅=10.1.12.1
𝑁𝐸𝑇𝑀𝐴𝑆𝐾=255.255.255.0
𝐺𝐴𝑇𝐸𝑊𝐴𝑌=10.1.12.10
wen a real server has more than one network interface configured with a GATEWAY= line, always te first one to come up will get the gateway.in a case were bot eth0 and eth1 are confiured and eth1 is bein used as Load Balancer,in suc a case realservers may not be in a position to route requests properly
It is advicable to turn off te extra network interfaces by setting ONBOOT=no in their network scripts within the /etc/sysconfig/network-scripts/ directory or by ensurin the gateway is correctly set in the interface tat comes up first.
Enabling NAT Routing on the LVS Routers
a simple NAT Load Balancer configuration in which each clustered service uses only one port an example port;80, the administrator is required of him only to enable packet forwarding on the LVS routers so that the request will be properly routed between the outside world servers and real servers,
but more configuration is necessary when the clustered services need more than one port to same real servers during a user session. wen forwarding is enabled on the LVS router and real servers are set up having clustered services running, we use keepalives to configure IP information
avoid configur the floating IP for eth0 or eth1 by manually editing network scripts or using a network configuration tool,but configure them via keepalived.conf file.
When the process is completed, start the keepalived service and Once it is up and running, the active LVS router will begin routing requests to the pool of real servers.


Leave a Reply