XAMPP is a Linux PHP development environment, it is free easy to install Apache having PHP, Perl, and MariaDB. To Install XAMPP the prerequisites you need to have include:
- Have a Command Line Interface
- Ubuntu installed on the computer
- As a User, you need to Have Sudo Privileges
Downloading Installation Packages
We have to get the package from the XAMPP Official Apache Friends webpage click on the XAMPP Linux Link and save the file to a folder you will access from.

Making the XAMPP Package Executable
The package we have downloaded needs to be modified for it to execute by making the file executable, we move to the folder we downloaded the files to via Commands for our case ours is in Downloads so this is the command we used:
cd /home/[username]/Downloads
Once you are in the folder, we now proceed to make the file executable using the command chmod
sudo chmod 755 [package_name]
the package name for our case is ''xampp-linux-x64-………run'
The command will not give any output but we can proceed to check if the step was successfully performed by the command using the below command:
ls –l [package_name]
What you are supposed to check on the output is whether permissions include rwxr –xr –x 1 including the name of the user with rights to execute
Launching the Installation Wizard
We will run a command which opens for us a Graphical setup window, the XAMPP Setup window will open on top of the terminal
sudo ./[package_name]

Installation of XAMPP
On the Window that appears click on next, then choose the components you will require installed, if you are new to XAMPP I will recommend you use the recommended installation, also you can specify where you want the software to be installed.
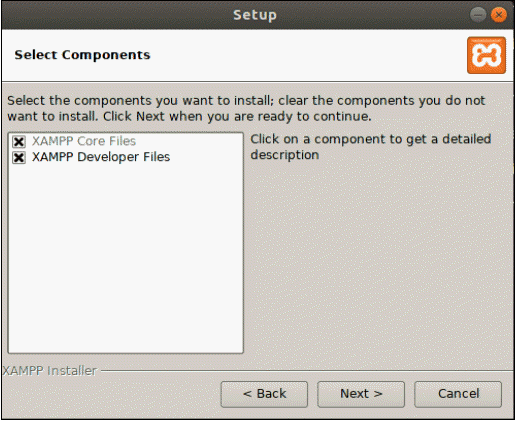
Once all the software and location is chosen XAMPP is now ready to install on your Ubuntu system Next, the wizard will notify you that it is ready to install XAMPP on your system. Click Next to start. This will launch the installation process and a dialogue box showing the progress will appear on your screen. The final dialogue box should display that the setup has finished installing. You can complete the process and launch XAMPP by clicking Finish.XAMPP will launch its control panel as shown in the below image. From the control panel, you can manage the server status by selecting start or Stop

Conclusion
Minutes after completing We can now verify that XAMPP is successfully installed and everything is running well by entering these URLs http://localhost/dashboard in browser.If the XAMPP Dashboard shows as in the image below means installation is successful
In a situation you wish to uninstall XAMPP, it can be done from the terminal, and here are the commands you can use
cd /opt/lamp:-navigate to folder
sudo ./uninstall :-command to uninstall
You will get a notification you need to confirm if you indeed want to uninstall. Once the installation is complete use the below command to remove the folder
sudo rm –r /opt/lamp
Related Content


Leave a Reply